(Three posts this week If you've missed The Facts Of Life you should back track. You might of missed something.)
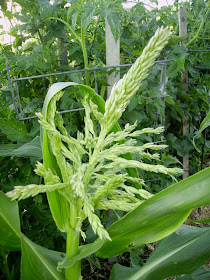
It just isn't right. The corn is up to my waist and tasseling. That's why I'm not smiling in the photograph. My garden needs some warm weather and I don't think we're going to get much.
I took this picture to emphasize my point. That is tomatoes behind the volunteer corn stalk. The seed brand touts that it is a good cold emergence species. That looked pretty good to me when I ordered a pound from the seed company and it did well last year passing in height my five foot seven inch frame. But obviously, emerges well in cold soil and grows well chilled are not synonymous.
This year, Kirk's folks planted corn eight days apart and the second planting is twice as tall as the first. Just for those asking how come, I'll explain what I've learned. The experts say that shade, length of daylight hours, and temperatures effect the length of corn. In other words, they need enough shade to cause them to reach for the sun, lots of water, and plenty of hours of sunlight to grow in, plus warmth - lots of warmth. That's what we've been missing this summer is warm temperatures. Also, timing is everything. If your corn has five visible leaf collars then that is when corn elongation begins. Prior to that the roots are the ones mainly growing. Cold weather hit us at this vulnerable stage and you can see what happened.
I think I'll do what Kirk's folks did and plant part of my corn a week apart. In this county, one if not both of them is bound to hit a cold spell but then again one can always try.
What bothers me most isn't the height but the promises of seven to eight inch ears that isn't going to happen. I've never had short corn and big ears. Is it possible?
And, as if cold weather isn't bad enough, I found Smut in the middle of my corn patch. Remember the facts of life I told you about? Well, I left out the dirty part. Here it is. The nasty fungal infection called Smut destroys ears, stalks or stems of your corn and it is all because of that grasshopper in the upper right hand corner of the picture, almost. Insects, hail, dry weather (which we just had a bout of) and corn planted in lots of manure are the cause of the fungal infection that plagues corn.
There doesn't seem to be a cure for Smut so I cut out the unsightly growth. If I leave it, it will rupture spewing spores that can remain viable for five to seven years. About as long as the news reports say we're to be tormented by the grasshoppers.
It is said that Mexicans think this growth is a delicacy to eat, tastes like mushrooms. Sometimes, I think people will eat anything.
*************************************************************************************
I'm pretty clear on how to handle Smut but the corn suckers pictured growing out the sides of the base of the corn plant I'm not convinced the experts know what they're talking about. We live in a part of Wyoming where the soil is poor and the University page I referenced said leave them because they won't do any harm. But, I question do they do any good? My corns having a hard enough time gaining any height without feeding them too. Should I pluck them or shouldn't I? Maybe, I should take a poll or is there an experienced gardener who's reading this blog and can direct me as to what I should do?
The suckers on the tomato plants on the other hand I know what to do with - get rid of them. They use up nutrients your tomatoes need and block the sunlight from reaching the center of the plant.
I prefer the types of tomatoes that naturally don't have suckers but aphids destroyed the plants I started in the house. My choice that day in the commercial greenhouse was Big Boys or Big Boys so, I bought Big Boys. Keeping a third of the plant trimmed out while fighting the suckers makes these plants very needy and I'm a lazy gardener. They also aren't loaded like my Roma's have been in the past. I don't think they'll be back next spring, unless they volunteer. I'm a sucker for a volunteer.
Note the sucker in the fork of this tomato stem.
Thursday, July 30, 2009
Wednesday, July 29, 2009
She Crowed
Disturbed from my slumber, I looked about confused. The bedroom was dark and I rolled over to look at the alarm clock, 4:45. What had awoken me? I lay still listening to the night's sounds through the open window waiting for a clue. Cockadoodle doo... 'Oh, great! Don't tell me that's coming from our backyard.', I thought as a mild panic raced through me. Cockadoodle doo... 'That is coming from our backyard. We've put a rooster in town. Our neighbors are going to love us. (sarcasm) It has got to be that white hen.'
Amazingly, the two dogs in the houses next to us weren't barking, like they do at all hours of the night. Their howling doesn't seem to bother our neighbors but I don't think they'll be as tolerant of a rooster crowing waking them at dawn. I slipped on a pair of shoes and quietly stole out the back door for an exploratory round of the backyard. The sun was just a blush on the horizon but there stood the white hen in the bean patch, her head thrown back crowing. 'I guess that clears one matter up.", I thought. It's not a hen as I had figured.'
The strange looking chicken had a thick neck, big round eyes - larger than any chicken I'd seen before- a pea sized comb, and a hen's hackle. I didn't know what it was, but through the process of elimination, I figured it must be a white Wyadotte hen. I'd ordered two Silverlaced Wyodotte hens from the hatchery and I had only received one but there was this white chick without an identity and so I deduced that they must have substituted a white Wyadotte for a Silverlaced. Wrong!
Staring at my hen crowing I figured, 'I guess this settles when I'm butchering chickens.' Then began to formulate a plan for my day that included the three roosters at the corrals. They were a little small but, since I was making the mess, I might as well do them too.
Once again, I wasn't about to pluck chicken feathers by myself for in that task misery definitely needs company. My family baled on me years ago when the stench of hot wet feathers and warm guts was too much for them and turned their faces green. Shortly after that, my husband made a bargain. He'd skin and gut the wild game if I'd do the chickens. The process of dipping chickens in hot water to remove their feathers, that I'd learned as a child, went out the window and I decided to try skinning them like you do pheasants. After all, we don't eat the skin anyway. Chickens were easier than pheasants and I haven't plucked one since.
I'll give you a walk through the process. I've tried to sensor the pictures but I am butchering a chicken so if this is a bit too REAL WORLD for you then stop at the picture of Jackie's rooster that came over to visit our corrals and don't continue on.
**************************************************************************************
Once I've killed the chickens, I haul them home to the kitchen sink where I...
make a slice through the skin in the leg joint while the chicken is laying on their back.
Hold one hand below the joint and the other above and snap the joint open. You can then use a knife to slice through the joint removing the lower leg.
Then I make a small slice above the tail and grasping the skin on each side of the slice I rip, pulling apart the slit to expose the breast. Pull as far as it will open.
Then work your fingers around the leg while holding the upper section steady with the other hand and pull the skin off the leg. Repeat on the other leg and pull the skin away from around the breast of the chicken toward the spine, running your thumb along the backbone to release the skin. This is the only spot where the skin is attached to the meat and resists being separated. Then repeat the leg process with the wings. We do not like the tips of the chicken wings so we cut those off and save the limb nearest the body. The chicken will be left with the tail and feathers. That I slice off also. It's just fat.
This can be done before or after you make a small slice above the tail on the breast side.
Pull as you did with the skin to reveal the insides.
During the fifteen years we home schooled butchering chickens became Chicken Biology 101 with our children crowded around the kitchen sink watching. (Without the smell of hot wet feathers the process isn't half as odoriferous.) We have witnessed an egg from when it is just a yellow dot of yolk to when it is fully formed and coming down the oviduct. (That particular chicken we thought had stopped laying and it had but it started up again on that fateful day.)
The insides can be removed with your fingers and then all that remains is a good washing with cold water to clean the bird and cool the meat for freezing.
If you desire you can cut up the bird into legs, thighs, breast etc. I'll cover that process when I have a full sized bird to process.
Monday, July 27, 2009
The Facts Of Life
Didn't your mama tell you about the Facts Of Life? Mine either, just a bunch of pamphlets and videos but I'm going to give you the full scoop. Well, as far as I know it. Some of it I just figured out this morning.
Like this is a female squash flower
and this is a male.
Can't tell the difference? Look carefully at the center of the flower. The female is like a girl and the male is like a boy. Still don't get it? Go ask your mother. I'll bet she can tell - after all, she had you.
Or, if you can't do that, do what I did. I looked for a flower that had a baby buttercup squash growing at its base and figured a male blossom from a female blossom pretty quick.
Now that you know the difference, you can snip off some of the male blossoms and stuff them for supper. What do stuffed squash blossoms taste like? I don't know. Remember, I just figured out how to tell a male from a female this morning. I do know that sometimes a number of male blossoms show up before the females arrive. I know this because a couple years ago, I read about it when I was questioning why my squash blossoms weren't developing any babies. Just as the book said they eventually did.
And it's not just the squash that has caught my attention this year but one stalk of volunteer corn over by the tomatoes has me fascinated. I check it out each day to watch it's progress. The female part of the plant wears a silky number
and the male section is a crowning tassel.
The female corn silk must have had a wild Saturday night because from that day forward her tresses were no longer spiked and the tips became a flattering beet red similar to a blushing new bride. Sure enough, a little research on the internet today revealed she'd been twitterpated. You heard me. She was smitten and after three or four days of inhaling that passion pollen she is preparing to give birth - to a full ear of corn, I hope.
The male section had changed also and he now looks a bit frayed. His flowers are open and releasing pollen.
One thing our wind is good for is matchmaking as it carries the pollen to the silks. But what do you do if the wind is asleep? (What would that be like?) You can assist by hand pollinating. Just walk through your corn and give each stalk a good shake. Sometimes you have to stir things up just like any good matchmaker. It will release the pollen into the air so it can drift down to the silks. Each kernel is attached to a strand of corn silk and so it is critical that there are no wall flowers in this waltz or you'll have missing kernels on the ears of your corn.
Beans on the other hand are very private vegetables and do everything behind closed doors until it's time to show off the offspring. The anther ( the male) and stigma ( the female) are cozily pushed up against each other in the confines of the flower pedals. You know what happens next. Cuddle long enough and yup. The anther releases its pollen the evening before the flower opens.
Peas don't play the field either. Theoretically, it is possible that peas could be cross pollinated since the stigma opens before pollen is ready, but it rarely occurs. The reason is because pollination has already taken place before the flower opens. This makes beans and peas a good first seed saving project.
As I walked through my garden this morning discovering the facts of life and watching the insects carrying pollen as they played matchmaker, I realized just how romantic a garden really is.
They say, "love is in the air", in the summer time. Could be pollen is passion powder in disguise. I think I'll take a stroll through our garden with my hubby tonight. Who knows what might transpire. Then again, he might just sneeze.
Thursday, July 23, 2009
In My Garden
Are these the good guys or some more bad guys? Right now, I could use a bug Zorro or two to help fight the crime in my garden. Especially if they would drive off the flea beetles and grasshoppers as they are having a smorgasbord at my expense. These little critters were amongst a bunch of ladybugs on my spinach that has gone to seed. Please say they are members of the crime stoppers...
...because I know these are the bad guys. Look what they're doing to my potatoes...
...and my grape vines.
...and my poor broccoli that the flea beetles haven't found yet.
Speaking of Flea Beetles, here they are and there the broccoli plant won't be by tonight.
Isn't it bad enough that I have to deal with soil the likes of which creates Grand Canyons on a model size. This crack is six inches deep. The rancher who sold this piece of property to build our town on said he avoided this plot of land whenever possible and couldn't figure out why the coal mine wanted to place its workers here. I'm still trying to figure that out as I battle to readjust the soil each year as the clay resurfaces to starve the plants of air and compact their roots.
Unlike my father, who numerous times told me in an exasperating tone, "Your more stubborn than a mule.", I'm grateful for my tenacity since it is what has kept me going all these years climbing those steep hills of life. One of my trials has been gardening for twenty-eight years in this blasted soil. Compound the insect infestations and the weather which recently we suffered an intense drought for over seven years where the sage brush was dying and we joked that even the jackrabbits had to pack a lunch and it's a wonder I'm still gardening.
Thankfully, the weather is getting back to normal and I've vowed to not complain about having to walk in Prairie Heels (My name for the clay that packs under your shoe heel after a brief shower.) for the moisture renews the countryside for my bees and saves on our water bill.
So what am I doing to enable a garden to grow in this poor piece of land? I'm learning by experimenting. In the name of improving my soil, I accidentally made sod bricks instead - the same type the pioneers created to build their homes in this county many years ago. I added to the clay soil grass and a little old hay, but not nearly enough manure, and I had a dandy brick-garden size. I've even created cement. Unfortunately, my asparagus is still cemented in and I hope this fall to begin to build it a new home. Years back, I added lots of sand with some humus thinking I was doing them a big favor. Well, the clay reclaimed its territory over the years and moved upward combining with the sand and now it's going to take a good dousing of water and a pry bar to break the soil loose from around their roots. Think I'm joking? You'll be the first one I call to come help. It is a near miracle that the asparagus surfaces at all. To find the stalks amongst the native grass, I have to hand trim the blades breaking them off at the ground's surface, for the grass can't be pulled.
I haul in two eighteen foot long by four foot high trailer loads of manure every two or three years and in between a number of pickup loads. It is not enough but it is all I every other disc bulging and a fusion on the bottom can handle. Because we don't have a tractor and I'm not able to haul more manure our vegetables are planted as close as possible to each other. I'm not leaving any empty space and very few walking paths.
This has the advantage that soon the plants are big enough to choke out the weeds because there isn't any extra space for them to grow in. Little evaporation takes place since the plants shade the ground and I don't have to water as often - a big factor when the average rainfall in Wyoming is only thirteen inches a year and the cost of water isn't cheap.
With rows so close together, I only use a normal size hoe at the beginning of the year then I switch to a sugar beet hoe that's small and allows me to work in a confined space.
My six foot two son hates the plan because I, with my size eight shoes, have to tip toe while carefully plotting where to place my feet then twist and contort to pick the vegetables. He complains his size twelve shoes don't fit and I tell him to just think of it as a game. You remember Twister? I loved that game but he's not impressed with my garden version.
Every year, my garden gets a little better as I rototil it only once so as not to disturb the micro organisms and the worms who's excrement is magical and all of our animals contribute except our fourteen year old cat, but that's another story.
Our pigs( if they're in residency) and our chickens have become our garbage disposal for all our vegetable scraps and the meat scraps go to the barn cats. In the spring and summer, I feed weeds from around their coop to the chickens and garden extras like the runaway lettuce or zucchini the neighbors have had their fill of. I even plant Swiss chard just for the chickens because it handles frost well and I can feed it way in to the fall. The chicken's poop and their egg shells (which I grind up in the blender with plenty of water) are spread onto the garden to give it a boost of nitrogen and calcium.
The sawdust from the goats shed, beef shed, and pig shed is an essential ingredient as it shrinks and swells keeping the soil broke up. The animal manure which is high in nitrogen is needed to break it down and if not enough is available the plants will suffer. Hence, I add lots of old manure. The sawdust also raises the pH level of our soil but not enough so I have to add some sulfur fertilizer. If I put a deeper layer of sawdust I would off balance the needs of the plants for nitrogen. Remember that manure should be aged at least three months before being added to a garden. Mine is at least a year old except that which is mixed in the sawdust.
Sophie (the pig) thinks being helpful feels really good especially when it involves a nap.
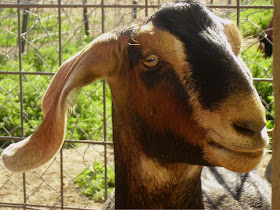
Who me, I'm helpful? Chicory seems to say and she's right, she isn't often helpful but goat dingleberries ( poop) are an excellent addition to the garden, so is cow manure.
Tinker Bell, our yearling heifer, even contributes to the garden when on the rare occasion she tears up fence.
The cow panels which are four feet by sixteen feet work great when down sized and the damaged areas snipped out with a pair of bolt cutters as a cutting torch takes too long. Then, we build tomato cages, or trellises for the peas, or concord grapes.
Peas with tomatoes in the background.
Don't worry if the cow panels are a bit bent. A straight row doesn't make your plants grown any better. Just don't make the pea trellis too tall. I used a section from last years experiment to train cucumber to climb and it doesn't straddle well when I'm weeding.
Baling twine from your already consumed hay bales works great for marking the rows to plant. We use small square bales so I fasten several pieces together. Just tie a knot by the stake that can be loosened because the twine stretches a bit and will need re-tightened. Don't forget those pole beans as they can trail up the twine and save on your having to purchase string.
When I clean out the old hay that litters the hay shed floor, I put it around the potatoes for mulch to discourage weeds and retain moisture. I also use my lawn clippings for mulch and spread the summers supply of sawdust from the sheds around the beets and beans.
I almost forgot to show you the army I hired to help me eradicate bugs. I brought home six pullets from the corrals and built a shed from scrap plywood for them. They're rather shy and wouldn't come out from behind the asparagus plants for two days unless, I was out in the garden. Then, they would scatter around especially in the youngest pea and bean rows looking for bugs. Not that they were more plentiful there but maybe, they, like me, feel more comfortable in the wide open spaces.
Australorps chasing bugs
With each day that passes the chickens adventure further into the garden and the grasshoppers are starting to take flight. So far, no damage to my garden crops from the chickens.
I was surprised to learn that the pullets had imprinted on me as they do tend to follow me around. When I call, "Here chick, chick, chick.", I'm ignored. But, if I holler, "Come on girls." they come sauntering over. Now go figure that one out.
(Correction in Lessons Learned I said our garden was too low a pH and I added sulfur well I changed the blog because I meant too high a pH and I add sulfur to acidify it. Sorry for the mistaken bleep.) For some reason in my head high acid means high pH.
Monday, July 20, 2009
What's This?
What did I take a picture of now, your wondering? Well, it's not spilled rice but eggs and pupae of the Carpenter Ant. I was mowing on beyond the lawn to try and discourage the infestation of grasshoppers. Our wet weather should have discouraged their reproduction but it hasn't. In fact, a local rancher told me they were haying as fast as they could ahead of the pesky insects for they were stripping their alfalfa fields clean. I figured that was all my garden needed, after two hail storms and the late frosts, is a swarm of grasshoppers.
Anyway, a piece of a two by six board was laying in my mowing path, so I picked it up. Underneath was this colony of ants and their offspring.
It was a good thing I still had my camera on me because in a matter of a few minutes the hundreds of eggs under the old board were carted off and stuffed down into the dark crevices of the earth.
Curiosity got the best of me and I looked up types of ants on the Internet and then their life cycle. They just have to be Carpenter Ants as they fit the description perfectly. Don't look at the red coloring the photos give them for the pictures are deceiving, they are pure black.
The ants were suppose to emit an odor when disturbed but, I didn't smell anything when I moved the board. Then again, my nose always runs a bit when I mow. The Internet didn't say whether the smell was good or bad. Of course, I like the smell of manure as the wind picks it up and whiffs it past my nose so maybe, they figured that was for us to judge.
What I found fascinating was that these ants can range in size from a quarter inch to a half inch, all in one colony. Ours are small, but that's not surprising because the food supply of aphids and fruit isn't plentiful. What really surprised me was that little ants do not grow up to be big ants. They don't change in size.
But, I think whoever named the workers was being degrading when they gave those who forage and care for the young the title, Minor Workers and those that guard the colony, Major Workers. Neither one would exist if they didn't do their respective jobs, so I think they should be renamed.
Garbage collectors can now be called Sanitation Engineers ( Or do they have a different title again?) then, why can't Major and Minor ants be called something else. How about Sentry Workers and Living Essentials Workers. Mmm..., too many s..es. I feel like I'm hissing like a snake. I give up. My brain is still working on my next gardening blog and the hordes of bugs that have suddenly descended upon my garden. Let me know if you come up with something better, while I join the battle outside. We've employed a small army to help fight the infestation of grasshoppers and Flea Beetles - only, they don't fight unless I'm by their side. Join me this Friday or maybe sooner to view pictures of the troops plus more gardening tips - that is if there is a garden left. Otherwise, I'll be showing a disaster film.
Saturday, July 18, 2009
Lessons Learned
(Three postings this week. Don't miss the macro photography blog.)
Potatoes
The blossoms are fading on the potato plants today and the peas are flowering. It won't be long before I'll be snapping peas and worming my fingers down into the earth to steal a few new potatoes. Once the new potatoes are cooked I'll add fresh peas and smother them in fresh goats milk before I heat them and sprinkle with black pepper. I've planted red and white potatoes as some years one does better than the other.
Peas
Up until now, we've only had lettuce, spinach, and asparagus but I'm hunkering for a juicy tomato and zucchini fried on the grill. The store may offer them but there is nothing like the taste of fresh home grown vegetables and fruit. The tomatoes I grew in potting soil one winter tasted just like the stores - soft and tasteless. It confirmed my hunch that the flavor had to do with the quality and type of soil because we have carrots that must have a sugar content off the charts. No maple or honey drizzled on them for us. We've got the real deal. Then again, my apples should be sweet and they were really tart. I added lots of manure last year and we'll see what this years crop does.
Another view of our Garden
My green beans have always been planted in double rows but this year, I'm trying them in single rows and I'll see if the plants grow larger and have a higher yield. The beans in the newer section of the garden I see are lacking in nitrogen and I've given them a boost but they seem to need it again.
When I saw how poorly they were doing I was glad I planted another two rows in the old greenhouse that is missing a cover. They should be ready the end of August or the beginning of September. With the grasshoppers as bad as they are this year, I hope at least one of the sections survive. And if both do then I plan on leaving some beans on the oldest plants and saving seed from them.
Another reason for planting vegetables in two or more areas of the garden is that disease such as a fungus is less likely to spread to your entire crop and bugs well, I learned my lesson with flea beetles. Those black little pests that jump can eat a young broccoli plant down to the nubbins in one day. For several years, I lost my broccoli to them until I placed them alternately with my tomatoes. This year, I've placed them in three different sections of the garden and planted them at different times because moisture and the time of year is a big deal with the monsters.
Lesson 3. Planting each of my garden vegetables in two or more areas of the garden, has two big benefits:
Baby Spinach
I mentioned planting my beans in a double row versus a single row and my onions in rows versus sections. Some crops it isn't as important the pattern they are planted in but others it makes a significant difference. Spinach for instance does much better in a section. I haven't planted it for three years as I let a batch go to seed one year and they've come up as volunteers every year since. I just till around them so that they are controlled into a kind of square shape and I'm eating spinach in early May now not late June; This year, I heard that others were planting spinach in the fall not spring which is what mine is doing naturally. Inbreeding is concerning me though, because I did the same thing with carrots in a cold frame and after a few years I had the craziest colors from white to dark orange. Their texture became rather wooden and the flavor wasn't as sweet. I've some studying to do on that matter as far as it has to do with spinach. Also, growing spinach in a section rather than a row helps them withstand frost, keeps them cooler in the hot weather so they don't bolt as quickly, and the soil doesn't dry out as fast because they shade one another.
Volunteer corn
This sunflower along with a few others are scattered throughout the garden. The seed must of blow in from the bird feeder. The seedlings that weren't in the way, I left. They have brightened my days.
I do know how to eliminate thistle from my garden without pesticides for if the weed pops up in my garden I know that that area's pH is too high and I add sulfur to acidify the soil. My new section did just that this year and so I added another dose of sulfur fertilizer and only one new thistle popped up but it was a sickly yellow.
A holistic ranch manager told me that different plants draw to the surface different nutrients from down deep in the soil. It made me feel much better about the weeds in my garden and I imagine all the good they're doing me. Then again, they may only be stealing nutrient but as long as they don't get out of hand, some of them are staying if only because I get tired of fighting them.
When an old gardener and scientist in the field said not to pluck the weeds from your garden after six to eight weeks I felt pretty smart even if it was by default, for I wasn't weeding at that time anyway. That's when I'm in the middle of freezing and bottling my harvest for the winter. Apparently, you disturb the roots of your vegetables which have by then spread out and the plant spends its energy not toward the fruit but in repairing the damage you've wrought to its roots.
Potatoes
The blossoms are fading on the potato plants today and the peas are flowering. It won't be long before I'll be snapping peas and worming my fingers down into the earth to steal a few new potatoes. Once the new potatoes are cooked I'll add fresh peas and smother them in fresh goats milk before I heat them and sprinkle with black pepper. I've planted red and white potatoes as some years one does better than the other.
Peas
Up until now, we've only had lettuce, spinach, and asparagus but I'm hunkering for a juicy tomato and zucchini fried on the grill. The store may offer them but there is nothing like the taste of fresh home grown vegetables and fruit. The tomatoes I grew in potting soil one winter tasted just like the stores - soft and tasteless. It confirmed my hunch that the flavor had to do with the quality and type of soil because we have carrots that must have a sugar content off the charts. No maple or honey drizzled on them for us. We've got the real deal. Then again, my apples should be sweet and they were really tart. I added lots of manure last year and we'll see what this years crop does.
Lesson 1. Soil nutrients effect flavor and texture of fruits and vegetables.
Another view of our Garden
The vegetables we are low on in the food storage room, I plant in at least two locations in the garden. Why? This year, my onions in the newest garden section are a third the size of the ones pictured above in the older area and had I planted them all in the new area, I would have only onions fit for salads. I think I know what the problem is and I'll fix it before next year. But, my experiment with putting them in a section and another group in rows doesn't seem to have made a difference in how well they grow.
Lesson 2. For some plants the pattern in which you plant
them makes a big difference.
My green beans have always been planted in double rows but this year, I'm trying them in single rows and I'll see if the plants grow larger and have a higher yield. The beans in the newer section of the garden I see are lacking in nitrogen and I've given them a boost but they seem to need it again.
When I saw how poorly they were doing I was glad I planted another two rows in the old greenhouse that is missing a cover. They should be ready the end of August or the beginning of September. With the grasshoppers as bad as they are this year, I hope at least one of the sections survive. And if both do then I plan on leaving some beans on the oldest plants and saving seed from them.
Another reason for planting vegetables in two or more areas of the garden is that disease such as a fungus is less likely to spread to your entire crop and bugs well, I learned my lesson with flea beetles. Those black little pests that jump can eat a young broccoli plant down to the nubbins in one day. For several years, I lost my broccoli to them until I placed them alternately with my tomatoes. This year, I've placed them in three different sections of the garden and planted them at different times because moisture and the time of year is a big deal with the monsters.
Lesson 3. Planting each of my garden vegetables in two or more areas of the garden, has two big benefits:
You are less likely to loose or have serious damage to your whole crop due to:
a. Bugs or disease
b. Or inefficient soil nutrients
a. Bugs or disease
b. Or inefficient soil nutrients
Baby Spinach
I mentioned planting my beans in a double row versus a single row and my onions in rows versus sections. Some crops it isn't as important the pattern they are planted in but others it makes a significant difference. Spinach for instance does much better in a section. I haven't planted it for three years as I let a batch go to seed one year and they've come up as volunteers every year since. I just till around them so that they are controlled into a kind of square shape and I'm eating spinach in early May now not late June; This year, I heard that others were planting spinach in the fall not spring which is what mine is doing naturally. Inbreeding is concerning me though, because I did the same thing with carrots in a cold frame and after a few years I had the craziest colors from white to dark orange. Their texture became rather wooden and the flavor wasn't as sweet. I've some studying to do on that matter as far as it has to do with spinach. Also, growing spinach in a section rather than a row helps them withstand frost, keeps them cooler in the hot weather so they don't bolt as quickly, and the soil doesn't dry out as fast because they shade one another.
Volunteer corn
Had this and a few other stalks of corn not shot up where they were planted last year, I would never of thought of trying to plant a few seeds this fall, mulching them, and seeing what they do come spring. Remember the spinach, well I also learned just a few weeks ago the corn should be planted in a square for better pollination and remember Nancy's mother with the corn planted in hills? Well, my corn is really in for some experiments next year. Another tip is to spray your corn when it tassels. I do it in the evening as the higher humidity helps with pollination.
Lesson 4.Try planting some of your crops in the fall for an earlier start.
Lesson 5. Some plants benefit from being grown in sections rather than rows or in between other plants.
Row of tomatoes
I had voluntary Roma tomatoes that popped up here and there throughout my garden for two years. Since they were late and never would have developed before frost, I transplanted them into pots and brought them inside to produce tomatoes for the winter. I put them under grow lights and a toothbrush did the bees job of pollinating. I changed the breed I planted this last year and I've no volunteers. I just might try several other breeds and see what happens.
This sunflower along with a few others are scattered throughout the garden. The seed must of blow in from the bird feeder. The seedlings that weren't in the way, I left. They have brightened my days.
Lesson 5. Weeds tell a tale.
Lesson 6. There is a time frame in which to pull them
and sometimes its best to just let them grow.
I look upon weeds a little differently than most. I thank God my soil is rich enough to produce them. The clay soil I started with is only fit for building sod homes and it has taken years of work and study to get where I'm at - still ignorant.
I do know how to eliminate thistle from my garden without pesticides for if the weed pops up in my garden I know that that area's pH is too high and I add sulfur to acidify the soil. My new section did just that this year and so I added another dose of sulfur fertilizer and only one new thistle popped up but it was a sickly yellow.
A holistic ranch manager told me that different plants draw to the surface different nutrients from down deep in the soil. It made me feel much better about the weeds in my garden and I imagine all the good they're doing me. Then again, they may only be stealing nutrient but as long as they don't get out of hand, some of them are staying if only because I get tired of fighting them.
When an old gardener and scientist in the field said not to pluck the weeds from your garden after six to eight weeks I felt pretty smart even if it was by default, for I wasn't weeding at that time anyway. That's when I'm in the middle of freezing and bottling my harvest for the winter. Apparently, you disturb the roots of your vegetables which have by then spread out and the plant spends its energy not toward the fruit but in repairing the damage you've wrought to its roots.
Lesson 6. Don't rototill any more than absolutely necessary.
Thirty years of working in my garden has taught me that the more I learn the more ignorant I realize I am. I read magazines and books to learn to be a wiser gardener and that knowledge gained helps my garden become better every year.
I try to only do it once a year so as to not disturb the worms and micro organisms. The worms till the soil and break down compost leaving behind worm casts that is one of the best natural fertilizers. Rototiller also kills the micro organisms that attach to the roots of your plants enabling them to draw in nitrogen and other nutrients from the soil. The powder you can buy and put on your bean seeds before you plant them to help them grow is what should be in abundance in your garden if you haven't killed them.
I was frustrated with a path between my back bed and the greenhouse and so in desperation I sprayed it last year to kill the weeds. They died and this year it was more lush than every before with different weeds than I was fighting the previous years. I rototilled it with two passes and now I barely have any weeds. That was an eye opener for me as I applied that knowledge to my garden - rototilling kills.
Lesson 7. Mulch your garden and you will use far less water
and have fewer weeds to pull.